Required Questions:
1. Tools are a major focus in this class. Though many things can be completed by hand, tools are often necessary. In creating artwork what type of tools have you used? In using these tools, how did they help your work along? Explain their function and purpose.
I have used many tools throughout this semester for creating my pieces such as the jigsaw, clay rib, sand paper, brushes, modge podge, box cutter, and many other clay tools. These tools all made my work much easier for me. They also made it so I could get my work done much quicker. Without the jigsaw I have no clue how I would have made my book box because I needed it to cut the wood. My cuts with the jigsaw weren't perfect, and if I hadn't had sandpaper my box would not have looked nearly as nice as it does. I needed the modge podge to get all my quotes and such onto the box. The clay rib and all of the other clay tools were used for almost every single clay project that I made this semester. Without them it would have taken me much longer to get my pieces to look as nice as they do. The box cutter was very helpful for creating my Captain America shield because the xacto knife was not thick enough or strong enough to cut through the cardboard. Without the box cutter tool I would have had a harder time cutting circles out of cardboard. I also used an assortment of brushes for painting glaze onto my clay pieces and applying modge podge.
2. How has your knowledge and understanding of tools changed since the beginning of the semester? Talk about your growth of understanding.
I have a much bigger appreciation for these kinds of tools now than I did at the beginning of the semester. At first I didn't think that I would need to use the clay tools very much for my clay pieces, but I was wrong. They are very helpful in getting your pieces to look smooth, and exactly how you want. At first I wasn't very good at using the tools, and I got frustrated easily because I am an impatient person. Eventually I got better, and now they make my clay pieces look so nice. Also to anyone who makes boxes look perfect, that is very hard. I learned through trying to make my book box that while you might think that cutting with the jigsaw will be easy and perfect, it probably won't be. You will need to sand it to make it fit together better. So I am impressed with anyone who can build a box on their own after using a jigsaw.
Pick 3 Questions:
1. What was your favorite material that you used this year? Why do you like working with it?
If I had to pick one material as my favorite to work with out of everything that I used this year it would probably have to be clay. I really enjoy the feeling of molding the clay. I also like that you can make clay into pretty much whatever you want.The process of sculpting something from clay is one that I like a lot, especially when you can slowly see your vision beginning to form in the clay. Or when other people are saying that they can see your vision forming in the clay. Clay is probably the material that you get the messiest with, but I love using it the most.
2. Choose a place or artwork where the subject matter reflects you as an artist. One that you have a personal connection to. Please explain.
The piece that I made this year that I probably have the biggest connection with personally is my book box. I spent a ton of time on it, and I was very careful with putting it all together because it means a lot to me. Reading is a huge part of me, and when I like a book I remember it and I think that my favorite books partially shape me into who I am. When I read I forget about reality, and only think about the words on the page. When I made my book box I wanted to see little quotes from all of the books that I loved so I could be briefly transported into all of their worlds. I think this is the project that took me the longest to do, but I am very happy that I took my time with it and I am very happy with how it turned out.
3. Regardless of whether you liked or disliked a project, which one did you learn, grow, or develop the most from? Please explain.
I think that the project I have learned the most from is the unconventional materials project. With the other projects it was easier to come up with an idea because we could use whatever material we wanted as long as the project lined up with the theme. This time there was no theme you just had to make something out of whatever material that you got. Having a theme can be kind of helpful because it gives you a place to branch your ideas out of. With this project I had a really hard time just coming up with my idea, and I noticed that other people were having the same problem that I was. Although it was hard I do think that creatively I learned the most from it, even though I have yet to finish it.
Friday, January 8, 2016
Unconventional Material Challenge
When making this project I had to find different bottles that could make the right shapes to form the dogs body. Also wrapping the trash bags with the film tape was difficult because all of the shapes were fairly curved. I was successful at getting the shape of the dog, and if I were to do this again I would try to think of a better way to cover the trash bags. I picked making a dog because I have wanted to make a sculpture of a dog for a while, but I could never see it with the other projects. I could picture making a dog out of this fairly easily, but it ended up being much harder than I expected. The dog was actually the first thing that came to mind when I thought of what I was going to make. I could see it so clearly that I couldn't think of making anything else.
Monday, January 4, 2016
Sunday, December 13, 2015
Origami Installation
Wednesday, December 9, 2015
Tray and Cup
I liked the process of making my tray and cup. The tray was really fun to make because it made me think of Christmas with the snowflakes (but that also makes me sad that we still have more school before Christmas). The ribbon cup was really cool to make too, and I really like how they look. I used red underglaze on my tray to make it look kind of like a candy cane to stick with the Christmas theme. I didn't use any for the cup because it cracked, and I didn't know how I would use underglaze on it. So far my tray has turned out successful, and hopefully it will look good after the glaze is fired. The cup has some cracks in it, but other than that it turned out pretty good. For the future I would make sure that I stamp in all of the snowflakes plenty because some of the indents weren't deep enough for the underglaze to stay in. Also I would use more water to smooth out my ribbon cup to make sure it doesn't crack when it gets fired.
Tuesday, December 8, 2015
Figurative Work
The two main challenges of this project were making a box with sides that fit together nicely, and finding quotes that would fit into all of the tight spaces towards the end. After sanding and filling in any holes between the pieces of wood I managed to make the box look fairly put together, and the quotes covered up anything that didn't look totally perfect. For the quotes I ended up using more titles and small quotes on the back, and trimming off as much extra paper as I could to try to make everything fit. It took a very long time, but I finished eventually. I think that the different colors and fonts of the paper made the box look very neat, and that was definitely a success. The lid of the box was also a huge success. The gold pages on the book look very nice, and I like that the lid is a book. I think that the lid adds a very cool finishing touch to my box.
Monday, November 16, 2015
"Between the Folds" Documetary
I thought that this video showed a very unique perspective on origami, certainly one I've never thought of before. It made me realize that origami is so much more than just the little things that you learn how to make as a little kid. Here are some of the things that I learned:
Origami is a metamorphic art form. I didn't know exactly what it meant for something to be a metamorphic art form, so I tried to relate it to something metamorphic that I do know about: rocks (because I decided to take APES and Nagel has a lot of rocks). A metamorphic rock is a rock that has undergone transformation by heat, pressure, or other natural agencies. I can see how this relates to origami because the paper undergoes a transformation through applying pressure to the paper to make it fold in certain ways. That is how I interpreted metamorphic art, and I think that metamorphic art sounds really unique.
Le Crimp is a style of origami that was mentioned in this documentary that I found to be very interesting and unique. From what I saw in the documentary, and in looking up pictures online, Le Crimp appears to involve the paper having a lot more crumples, or crimps, in it that give the piece a more realistic look. Also sometimes the artist can blow into their Le Crimp piece to make it expand or suck air out to make it shrink, and I thought it was really cool how the artists could interact with their pieces even after they were done. Le Crimp is something I think looks really awesome, but I doubt I would ever have the time or patience to do it.
Origami math is a real life application of origami that I never thought of before. Origami can be used to help explain math both on a basic and complex level. I thought this could be really helpful for some people who are better at learning visually. Math is a subject that visual learners could struggle in because it is hard to make math visual. So much of it is writing equations, and it is hard to make it stick for the visual learners. Using origami, students have a way to make math visual. This will hopefully help more people begin to understand math.
Tuesday, October 27, 2015
Figurative Sculpture Artist: Michael Alfano
Michael Alfano works in Boston, but has events in many different states across the country. His sculptures are made from bronze, hydrostone, resin, or cold cast copper and bonded bronze. I like the way that his pieces portray humans. The two pieces I have picture above are called Labyrinth and Unwound, and I like how they literally interpret people as both of those things, but they also allow you to think about how people are like that figureatively. His work is literal to the name of the piece, yet it still requires imagination. His pieces aren't tiny either. Some may be smaller than others, but they are bigger than the pictures make them appear to be. A few of his pieces are actually small though. Alfano's website can by found by clicking his name: Michael Alfano
Tuesday, October 20, 2015
Vessel Project: Cinderella Shoe
Some challenges that I overcame while making my Cinderella Shoe were making the shape of the shoe realistic and smooth. The shoe had to start off as multiple pieces, and when I first started putting them together they didn't look at all like a nice shoe. Also making the bow was difficult because originally I was going to make it out of Plexiglas. The Plexiglas did not want to break in the right shape though, so I changed the material that the bow was made out of. The heel was a successful part of the shoe, and it ended up turning out much better than I expected. Also the bow was successful once I decided to not use the Plexiglas. I really like the shattered pieces of glass on top of it, and the glaze on the shoe adds a nice touch to make it look fancier. In the future I would try to find something clear to make the bow out of. I do like how it turned out, but i think it could have been really neat if the base was clear instead of white. This piece is a vessel because a shoe holds a foot, and in the case of Cinderella's shoe it holds a story. This piece isn't exactly functional because I don't think a clay shoe would be very comfortable, and I don't know who's foot would fit into this shoe anyways because it is fairly small.
Tuesday, September 29, 2015
Molds
I didn't take a picture of my mold when we did it because it was unsuccessful, and I didn't realize I would need a picture of it. I attempted to recreate the banana bowl, but when peeling the clay off of the bowl it all fell apart. If I had taken a picture it just would've been a picture of a big pile of pieces of clay, which is not very exciting. I think that the mold process is something that could end up being really cool for a piece, and it is something that I would be willing to try again in the future, but it definitely didn't work out for this project. I should've put something in between the bowl and the clay, but I didn't remember that step until I had already put the clay on the bowl. While the clay was on the bowl it looked like it was going to turn out really well, but the moment I started trying to take it off of the bowl it began falling apart. The mold process seemed to work well for other people, so it is definitely something that I would be willing to try again.
Monday, September 28, 2015
Vessel Mini Lesson (Pit Fired Piece)
To create my pit fired piece I started out with a clay base, and then made a coil of clay that slowly wrapped its way up forming the sides of the little container. I smoothed it out some so that the coil isn't quite as obvious. The container isn't very big, so I'm not sure what I will use it for yet. To prep it for the fire I took some of the copper and wrapped it around the top of the piece after it had been through everything that Mrs. Sudkamp had to do herself. Then I added a bunch of different kinds of leaves around my piece until I felt I had covered it enough. Lastly I wrapped it up in the tin foil. The finished product turned out pretty cool, and I really like how you can see where the copper burned away on my piece. I thought that this style of work was very unique and different, and it is something I would be willing to do again. I am debating using it for my main vessel project, but I am not sure that pit fired is the look I am going for with that piece. Either way I really like this method and the final product it creates.
Wednesday, September 23, 2015
Relief Main Piece
To make my piece I used techniques I learned from the cardboard mini project to create a Captain America shield. At first I wanted to make it look old and rustic, to represent Captain America before he got frozen in a block of ice, but water color didn't look too good on the cardboard. It just soaked into the cardboard and ended up looking more like mold then old paint. After trying the water color I decided I would use acrylic paint to represent the new Captain America with his new outfit and nicer looking shield. I thought my piece was successful because I ended up getting the shape and the colors of each section of the shield right. Also I think the size of the shield is fairly realistic. Next time I would try to find some way to make my circles a little more precise because they aren't totally perfect. Also I would find a way to better center all of the circles to make sure that the circles all line up in the middle. I decided to make this shield because I love Marvel movies, and Captain America is my favorite Marvel superhero. I have a few shirts with him on it, and I thought it would be really cool if I could make his shield.
Wednesday, September 2, 2015
Mini Projects- Relief
Clay Relief:
This is my clay relief tile. I think that this is probably Mr. Sands' favorite relief project that I did because it is a Zonkey. I think that it turned out really well and I am proud of my effort to make his favorite animal (or at least I am assuming that this is his favorite). The one thing that I found challenging was getting the clay out in the tight spaces, like around his nose and whatever you wanna call the two squares at the top, otherwise I thought this one was fairly easy. This one is probably my favorite of the mini projects because I feel like it is the one I worked the hardest on.
Cardboard Relief:
This is my cardboard relief tile. It is supposed to be a panda if you can't tell, and this is another one I am very proud of just because I think it turned out to be much better than I expected. The only thing that I found challenging about this was making sure I was only cutting through and peeling off the layers that I wanted to take off. The only thing that I wish could have turned out a little better was the panda's mouth. I ended up just making it a straight line, but I feel like it isn't noticeable enough.
Paper Relief:
This my paper relief (sorry that the picture didn't turn out very good, I was in a hurry to get it since class was almost over). This one is my least favorite because I didn't like working with the paper. It doesn't have layers that I could carve out or peel away like with the cardboard or clay, so it was harder for me to come up with what to do for this one. I would say that this is definitely abstract, and it turned out sort of how I envisioned it would.
This is my clay relief tile. I think that this is probably Mr. Sands' favorite relief project that I did because it is a Zonkey. I think that it turned out really well and I am proud of my effort to make his favorite animal (or at least I am assuming that this is his favorite). The one thing that I found challenging was getting the clay out in the tight spaces, like around his nose and whatever you wanna call the two squares at the top, otherwise I thought this one was fairly easy. This one is probably my favorite of the mini projects because I feel like it is the one I worked the hardest on.
Cardboard Relief:
This is my cardboard relief tile. It is supposed to be a panda if you can't tell, and this is another one I am very proud of just because I think it turned out to be much better than I expected. The only thing that I found challenging about this was making sure I was only cutting through and peeling off the layers that I wanted to take off. The only thing that I wish could have turned out a little better was the panda's mouth. I ended up just making it a straight line, but I feel like it isn't noticeable enough.
Paper Relief:
This my paper relief (sorry that the picture didn't turn out very good, I was in a hurry to get it since class was almost over). This one is my least favorite because I didn't like working with the paper. It doesn't have layers that I could carve out or peel away like with the cardboard or clay, so it was harder for me to come up with what to do for this one. I would say that this is definitely abstract, and it turned out sort of how I envisioned it would.
Tuesday, September 1, 2015
Inspired Artist
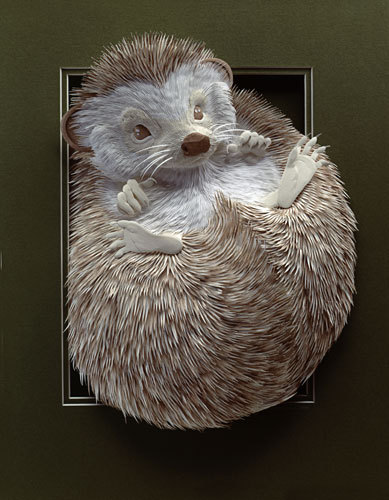
My inspired artist is Calvin Nicholls and he lives in Ontario. He works with an interesting material, paper, and he does relief art like we have been doing in class. His relief is of a much higher level though and one thing that I really love about his work is the attention to detail. He seems to typically do animals and if they have fur he really manages to make it look realistic. Also he adds little details that make the piece even more interesting than it was in the beginning. One piece that is a good example of this is the dog that I have shown above. The detail that can be hard to notice is the outline of the cat in the dogs eye. I found that very neat how he could hide something like that and the moment I noticed it the cat became completely obvious. This made me feel like I should have noticed the cat at the very beginning. Here is a link to his webiste: Calvin Nicholls. I am positive that his paper relief is way better than my attempt of it in class.
Monday, August 31, 2015
Styrogami
I feel that my styrogami piece was somewhat successful. The first time I tried to do this it didn't go very well and I ended up scrapping it for this one (partially because Grayson thought he could "fix" it which turned out to mean break it). This cup was supposed to show a spiral effect, and if I could change anything about it I would try to make the toothpicks a little less noticeable. Also I would try and make the spiral not quite as thick so that there would be more spirals going around throughout the whole cup. This picture, in my opinion, makes the cup look much better than it did when you were looking at it in real life. While my cup wasn't by any means the prettiest or the most creative I still think it was a success because I am happy with how it turned out (and it didn't break like the last one did).
Wednesday, May 27, 2015
Final Exam Blog Post
ART INSPIRING TECHNOLOGY
This piece was one of my favorites because of how cute it is, and it shows art that inspired technology. I used art to draw the seal, cut it into pieces, and color it. I used technology to take pictures of the seal in different positions, and I used the computer to make the seal appear to be moving in a cycle. The art that I used to create the seal inspired the use of technology to try and make the seal move. I thought that the seal was too cute to just be a simple drawing of a seal, so I wanted to make it move with the use of technology.
TECHNOLOGY INSPIRING ART
In this piece I used technology to make art. I used technology to take all of the individual pictures of Kara, the jump rope. the sport court, the USA Jump Rope logo, the frames, and of me. Then through photoshop to cut Kara and I out of our pictures, change the color of the inside of our frames, and in general just piece the picture together. In the end it created art that was nothing like any of the individual pictures. Kara and I are on different jump rope teams and using technology I was able to create art that showed the battle that we go through at competitions.
PERSONAL CRITIQUE: WE COLLABORATE
This project was one that was worked on by a big group of students from our class. If I remember right it was Kara, Megan, Ashley, Grayson, Chris, Caitlin, and I. We collaborated a lot to create this dog. We were all constantly asking each other to back up and look at the dog to make sure that it looked right because we all wanted the dog to turn out really good. Kara drew the dog in her sketchbook and inspired us to draw it on the street. She helped us figure out the size to make the dog so it would stay proportional to the size it was when she drew it. Without Kara we wouldn't have even had the idea to create the dog on the street. We all worked together really well and the end result turned out to be very close to the original.
SUCCESS
This project was my most successful because I actually managed to make Carter's stick arms look like they are my arms. I didn't think that this picture was going to work out nearly as well as it did, and I am very happy with it. I solved problems because I had to clone my hair to make it where my arms used to be because my arms were in a slightly different position than his were. I also had to blend our skin tones to make it look more realistic. I developed my art skills because before this project I had never been able to successfully use the clone tool on anything, and after I was able to use it to make it look like I actually have hair where I don't.
DO OVER
If I had to choose one project from this year to do again it would have to be the light art. It sort of worked, but right as we were finally starting to get it class ended. If we were to redo this I would want to make the room even darker because everything we did had a red light in it because the red paper was too thin. Also since we would already know how to do the light art from last time so we would hopefully be able to get much better pictures this time. We could even try some completely different designs with the light from what we did before.
Thursday, May 21, 2015
12 Days of Photoshop: Day 7
Today we had to combine a Disney character with a superhero. I chose to take Esmeralda from Hunchback of Notre Dame and combine her with Loki from The Avengers. Here is what Esmeralda looked like before I merged her with Loki:

Here is Loki before he was merged with Esmeralda:

Here is what they look like merged:
I think that it turned out pretty well.
Here is Loki before he was merged with Esmeralda:
Here is what they look like merged:
I think that it turned out pretty well.
Wednesday, May 20, 2015
12 Days of Photoshop: Day 6
Harry Potter becomes Hairy Potter when Harry gets facial hair and Hermione becomes a cat. Ron gets a hairy spider.
Tuesday, May 19, 2015
Monday, May 18, 2015
12 Days of Photoshop: Day 4
Literal Interpretaions
This is what these words would mean if you took them literally.
Horse Shoe:
Dogwood:
Jellyfish:
Eardrum:
Watercolor:
Subscribe to:
Posts (Atom)