Tuesday, September 29, 2015
Molds
I didn't take a picture of my mold when we did it because it was unsuccessful, and I didn't realize I would need a picture of it. I attempted to recreate the banana bowl, but when peeling the clay off of the bowl it all fell apart. If I had taken a picture it just would've been a picture of a big pile of pieces of clay, which is not very exciting. I think that the mold process is something that could end up being really cool for a piece, and it is something that I would be willing to try again in the future, but it definitely didn't work out for this project. I should've put something in between the bowl and the clay, but I didn't remember that step until I had already put the clay on the bowl. While the clay was on the bowl it looked like it was going to turn out really well, but the moment I started trying to take it off of the bowl it began falling apart. The mold process seemed to work well for other people, so it is definitely something that I would be willing to try again.
Monday, September 28, 2015
Vessel Mini Lesson (Pit Fired Piece)


To create my pit fired piece I started out with a clay base, and then made a coil of clay that slowly wrapped its way up forming the sides of the little container. I smoothed it out some so that the coil isn't quite as obvious. The container isn't very big, so I'm not sure what I will use it for yet. To prep it for the fire I took some of the copper and wrapped it around the top of the piece after it had been through everything that Mrs. Sudkamp had to do herself. Then I added a bunch of different kinds of leaves around my piece until I felt I had covered it enough. Lastly I wrapped it up in the tin foil. The finished product turned out pretty cool, and I really like how you can see where the copper burned away on my piece. I thought that this style of work was very unique and different, and it is something I would be willing to do again. I am debating using it for my main vessel project, but I am not sure that pit fired is the look I am going for with that piece. Either way I really like this method and the final product it creates.
Wednesday, September 23, 2015
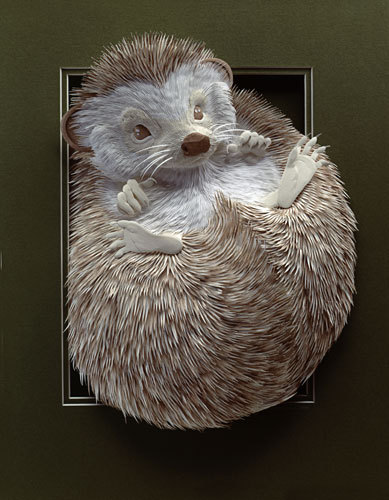
Relief Main Piece

Wednesday, September 2, 2015
Mini Projects- Relief
Clay Relief:

This is my clay relief tile. I think that this is probably Mr. Sands' favorite relief project that I did because it is a Zonkey. I think that it turned out really well and I am proud of my effort to make his favorite animal (or at least I am assuming that this is his favorite). The one thing that I found challenging was getting the clay out in the tight spaces, like around his nose and whatever you wanna call the two squares at the top, otherwise I thought this one was fairly easy. This one is probably my favorite of the mini projects because I feel like it is the one I worked the hardest on.
Cardboard Relief:

This is my cardboard relief tile. It is supposed to be a panda if you can't tell, and this is another one I am very proud of just because I think it turned out to be much better than I expected. The only thing that I found challenging about this was making sure I was only cutting through and peeling off the layers that I wanted to take off. The only thing that I wish could have turned out a little better was the panda's mouth. I ended up just making it a straight line, but I feel like it isn't noticeable enough.
Paper Relief:

This my paper relief (sorry that the picture didn't turn out very good, I was in a hurry to get it since class was almost over). This one is my least favorite because I didn't like working with the paper. It doesn't have layers that I could carve out or peel away like with the cardboard or clay, so it was harder for me to come up with what to do for this one. I would say that this is definitely abstract, and it turned out sort of how I envisioned it would.
Tuesday, September 1, 2015
Inspired Artist


Subscribe to:
Posts (Atom)